41
A Complete Guide to Installing an AI Meeting Assistant — From A to Z (For Non-IT Users)
AI Meeting Assistant is a browser extension for Google Chrome that automatically records speech during meetings on Google Meet or Microsoft Teams, distinguishes between different speakers, and generates meeting minutes (議事録) with a single click, powered by AI.

Part 1 — Downloading the Code
Step 1.1 — Visit GitHub to download the code
-
Open Google Chrome and go to: https://github.com/AnJnD/ai-meeting-assistant
-
You will see a webpage with "ai-meeting-assistant" at the top — this is where the tool's code is stored.
-
Find the green "Code" button located at the top right of the file list and click it.
-
A small box will appear. Click "Download ZIP" at the bottom of that box.
Note: You do not need a GitHub account. Simply clicking Download ZIP is sufficient.
-
The
.zipfile will be downloaded to your computer, usually in the Downloads folder.
Step 1.2 — Unzip the ZIP file
-
Open the Downloads folder on your computer.
-
Find the file you just downloaded, named
ai-meeting-assistant-main.zip. -
Double-click the file to open it, or right-click and select "Extract All..." (Windows) or "Open with Archive Utility" (Mac).
-
Choose a location to save it and click "Extract".
-
After extraction, you will have a folder named
ai-meeting-assistant-main. Open that folder, then open the subfolderai-meeting-assistant.The folder structure looks like this:
ai-meeting-assistant-main/
  └── ai-meeting-assistant/       <- This is the folder you need to use
        ├── manifest.json
        ├── background.js
        └── ... (other files)
Important note: Keep this folder in a fixed location, such as on your Desktop or in Documents. Do not delete or move it after installation, as Chrome needs this folder for the extension to work.
Part 2 — Installing the Extension in Chrome
Step 2.1 — Open Chrome's Extension management page
-
Open Google Chrome.
-
Type into the address bar (top bar):
chrome://extensions -
Press Enter. The extensions management page will appear.
Step 2.2 — Enable Developer Mode
-
Look at the top right corner of the
chrome://extensionspage. -
You will see a toggle switch labelled "Developer mode".
-
Turn that toggle on (it will turn blue).
This step is necessary to allow Chrome to install extensions manually, without using the Chrome Web Store.

Step 2.3 — Load the Extension into Chrome
-
After enabling Developer mode, you will see three new buttons appear at the top: "Load unpacked", "Pack extension", "Update".
-
Click the "Load unpacked" button.
-
A folder selection dialog will appear. Find and select the correct
ai-meeting-assistantfolder — the one containing themanifest.jsonfile.Note: Select the subfolder
ai-meeting-assistant, not the outer folderai-meeting-assistant-main. -
Click "Select Folder" (or "Open" on Mac).
-
The extension will appear in the list with the name "AI Meeting Assistant 1.0".
Step 2.4 — Pin the Extension to the Chrome toolbar for easy access
-
Look at the top right corner of the Chrome toolbar and find the puzzle piece icon.
-
Click it, then find "AI Meeting Assistant 1.0" in the list.
-
Click the pin icon next to it to pin it to the toolbar.
From now on, the extension's icon will always appear on the Chrome toolbar, making it easy to click whenever you have a meeting.
Part 3 — Getting a Free API Key (Google Gemini)
The extension requires an "API Key" to connect to Google's AI. It is completely free. See the detailed guide here: Detailed Guide: How to Get a Gemini API Key
-
Open a new tab in Chrome and go to: https://aistudio.google.com/apikey
-
Sign in with your Google (Gmail) account if you are not already logged in.
-
Click the "Create API Key" button.
-
A long string of characters will appear, beginning with
AIza...— this is your API Key. -
Click Copy, or highlight the text and press Ctrl+C to copy the string.
Keep this API Key secret. Do not share it with others. If it is compromised, you can create a new key at the same address.
The free key has a daily usage limit, but it is sufficient for regular meetings.
Part 4 — Configuring the API Key in the Extension
Step 4.1 — Open the Extension's Settings
-
Click the AI Meeting Assistant icon on the Chrome toolbar.
-
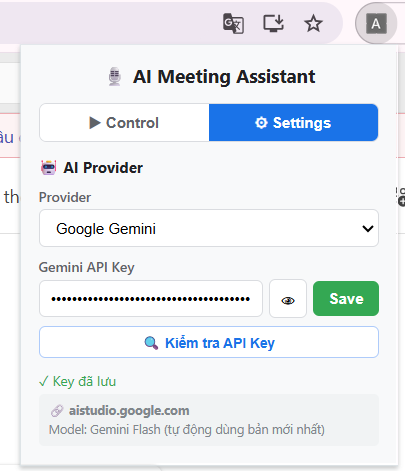
The extension window will appear. Click on the "Settings" tab.
Step 4.2 — Enter the API Key
-
In the Provider section, select "Google Gemini".
-
You will see an input field labelled "Gemini API Key".
-
Paste the API Key you just copied into that field (Ctrl+V or right-click and select Paste).
-
Click the "Save" button.
-
(Optional) Click "Test API Key" to confirm the key is working correctly. If successful, the AI model name will appear.
Part 5 — Using It in a Meeting
Step 5.1 — Join the Meeting and Turn on Captions
This is the most important step. The extension reads captions to record the transcript. If captions are not turned on, the recording quality will be poorer and it will not be able to hear other people's speech.
If using Google Meet:
- Join the meeting as usual on meet.google.com
- On the control bar at the bottom, click the "CC" button or "Turn on captions"
If using Microsoft Teams:
- Join the meeting as usual on teams.microsoft.com
- Click "..." (More) on the control bar, then select "Turn on live captions"
Step 5.2 — Start Recording the Transcript
-
Click the AI Meeting Assistant icon on the Chrome toolbar.
-
Click the "Start AI Assistant" button.
-
A small overlay window will appear in the corner of the screen.
-
The transcript (spoken content with speaker names) will automatically display in real-time.
Standby Mode feature: The extension automatically monitors captions from the moment you open the meeting page. When you click "Start", the entire content from the beginning of the meeting will appear immediately — no need to worry about missing the start.
Step 5.3 — Generate AI Meeting Minutes
-
When the meeting is about to end (or at any time you wish), click the "議事録作成" button in the overlay window.
-
Wait 10 to 30 seconds for the AI to process.
-
The meeting minutes will appear immediately in the overlay, presented in a professional format standard for Japanese companies.
-
Click "Copy" to copy the content, or "DL MM" to download it to your computer as a
.txtfile.
Buttons in the Overlay Window — Summary
Frequently Asked Questions
Nothing appears in the transcript? Check if Captions are turned on in Meet or Teams. Try clicking the "Reload" button in the overlay.
Getting an error when clicking "議事録作成"? Go to Settings and click "Test API Key". If it shows "quota exhausted" — wait 1 minute and try again, or go to aistudio.google.com/apikey to create a new API Key.
Is my meeting data exposed? The transcript is only stored on your computer in Chrome storage. Only when you click "議事録作成" is the content sent to the Gemini API for processing. There is no intermediary server. Which computers can it be used on? Any computer running Google Chrome (Windows, Mac, Linux). It does not support Firefox, Safari, or Edge.
If I close the browser midway, will I lose my data? The transcript is automatically saved every 15 seconds. If you reopen Chrome within six hours, the data will still be there.
Do I need to reinstall the extension every time I open Chrome?
No. The extension only needs to be installed once. However, do not delete or move the ai-meeting-assistant folder on your computer.
Summary — 7 Steps from A to Z
Step 1: Go to github.com/AnJnD/ai-meeting-assistant → Download ZIP
Step 2: Extract the ZIP file to a fixed folder
Step 3: Open chrome://extensions → Enable Developer Mode → Load unpacked the ai-meeting-assistant folder
Step 4: Go to aistudio.google.com/apikey → Create and copy an API Key
Step 5: Click the extension icon → Settings → Paste the API Key → Save
Step 6: Join the meeting → Enable Caption → Click "Start AI Assistant"
Step 7: At the end of the meeting → Click "議事録作成" → AI generates the minutes → Copy or Download
If you encounter any issues during installation, please contact the Admin for technical support. https://note-blog.com/feedback
Comments
No comments yet. Be the first!
You need to sign in to comment.