9
From Screenshot to Figma in Five Minutes — No Plugin Required
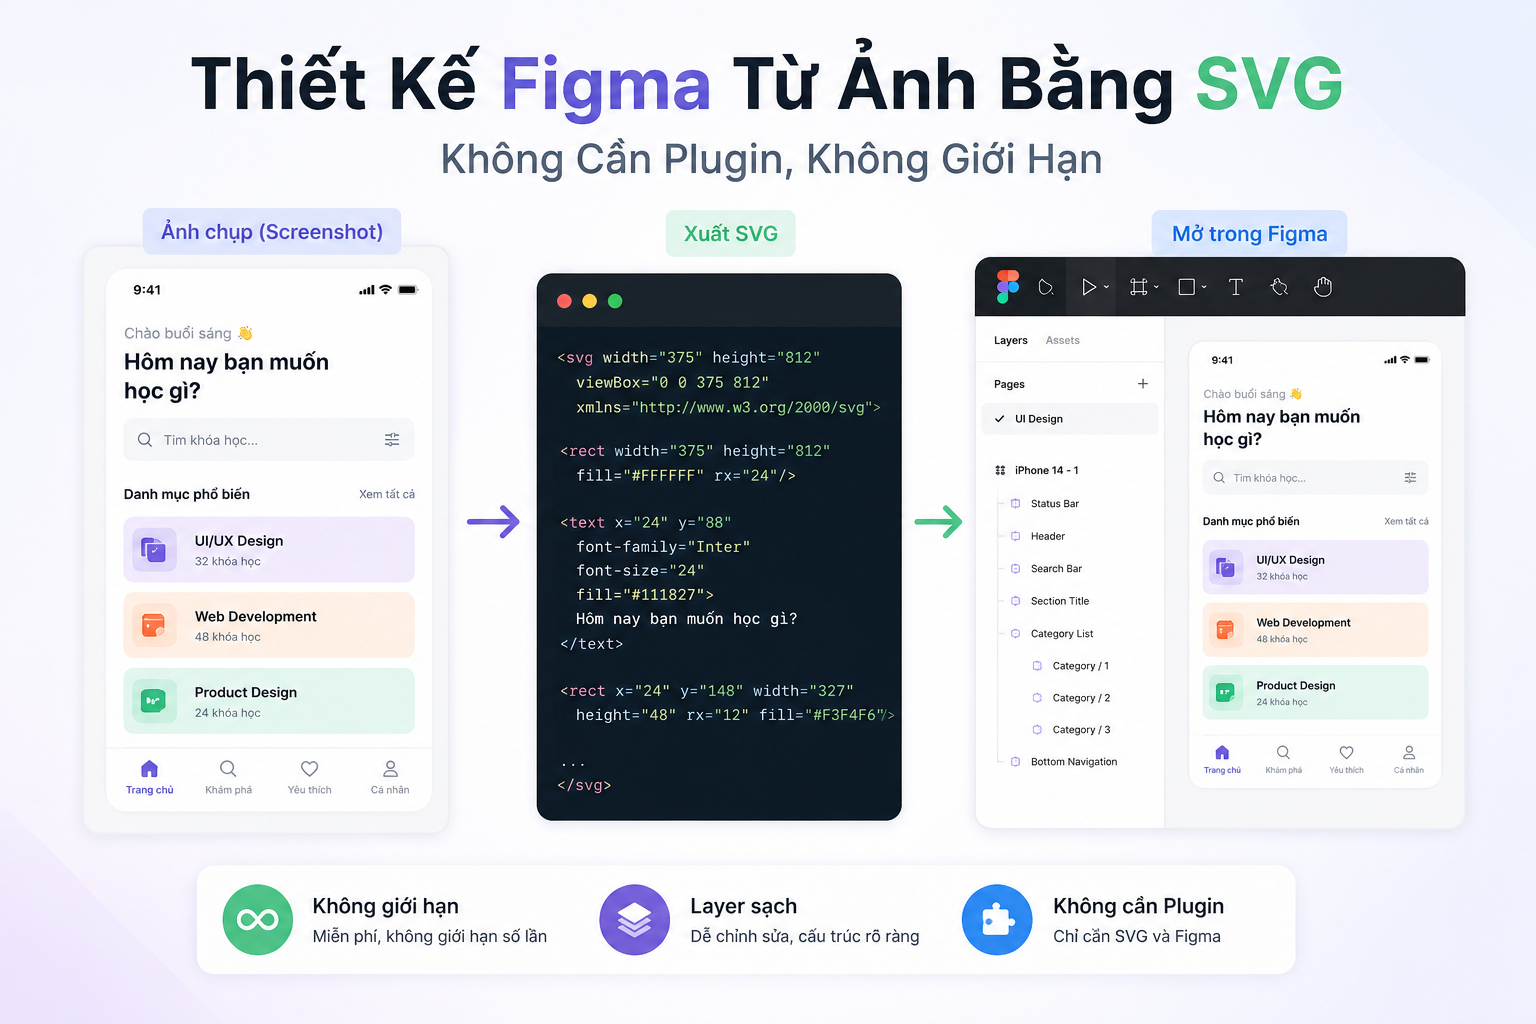
A practical guide to turning any screenshot into an editable Figma file using AI (Claude or Gemini) to generate SVG, then dragging and dropping it directly onto the Figma canvas — no plugins, no usage limits.
Why Use SVG Instead of a Plugin?
Plugins like html.to.design are convenient, but they come with a limit of 20 imports per month on the free tier. For a designer creating 10+ screens daily, that limit won't last a week. SVG is a completely free, unlimited alternative, and Figma supports it natively — just drag in a .svg file and you get editable layers immediately.
Article on html to figma: 6-Step Process to Convert Images into Editable Figma Files Using AI and html.to.design
What You Need
- A screenshot of the UI you want to recreate in Figma
- A Claude (claude.ai) or Gemini account
- Figma (the free plan is sufficient)
Step 1 — Prepare the Image
Take or save a screenshot of the design you want to convert. The clearer the image, the more accurately the AI will analyse it.
Step 2 — Send the Image to AI with a Standard Prompt
Open Claude (claude.ai) or Gemini (gemini.google.com), upload the image and use the following prompt:
Prompt:
Convert this UI screenshot to a clean SVG file for Figma import.

Rules:
1. Extract all colors from the image first. List them as:
   --color-name: #hexvalue
   Never invent colors. No generic defaults like #333 or #eee.

2. Canvas width: 1200px. Calculate height from content.

3. For icons: Instead of using pre-made icons, design a logo that closely resembles the submitted image.

4. Output complete SVG code ready to drag into Figma.
The AI's response will consist of two parts:
Part 1 — Extracted colour palette (before writing the SVG): Use this to check whether the colour codes match your expectations. If you want to make changes, fix them here.
EXTRACTED COLORS:
--page-bg: #f8f8f8
--sidebar-bg: #ffffff
--sidebar-border: #e5e5e5
--text-dark: #1a1a1a
--text-mid: #4a4a4a
--accent: #e84855
--border: #e0e0e0
--code-bg: #f5f0ff
--code-text: #c53030
Part 2 — The complete SVG file:
<svg xmlns="http://www.w3.org/2000/svg" width="1200" height="720" viewBox="0 0 1200 720">
  <defs>
    <style>text { font-family: "Inter", sans-serif; }</style>
  </defs>
  <!-- SIDEBAR -->
  <rect x="0" y="0" width="220" height="720" fill="#ffffff" stroke="#e5e5e5" stroke-width="1"/>
  ...
</svg>
Step 3 — Save the SVG File
Once the AI returns the SVG code, download the .svg file to your computer.
Step 4 — Open Figma and Prepare a Blank Design File
This is a step many people get wrong — you must be inside the canvas, not on the home screen.
- Go to figma.com → log in
- On the Drafts screen, click the "Design" button in the top right corner
- Figma opens a new Design file with a blank canvas — you will see rulers around the edge and a faint grid in the centre
- This is the correct place to drag your SVG file into
If you are still on the Drafts screen (only seeing a list of files) — dragging an SVG there will have no effect. You must enter the canvas first.

Step 5 — Drag and Drop the SVG File into Figma
- Drag the SVG file from your folder and drop it onto the centre of the Figma canvas
- Figma processes it in 1–2 seconds and displays the entire layout
Tips for Better Results
Regarding the input image: High-resolution images yield more accurate colour results. If the image is blurry or heavily compressed, the AI will struggle to sample the correct colours.
Regarding the prompt: Add the UI's language to the prompt if necessary — for example, "UI in Japanese, use Noto Sans JP font" to help the AI select the correct font-family.
Regarding icons:
Do not ask the AI to draw icons — the results are always inaccurate and time-consuming to fix. A light grey placeholder is much cleaner and easier to swap out in Figma.
On multiple screens:
If there are multiple images, send each one separately and name the SVG files in order (screen-01.svg, screen-02.svg...). Then import them all into the same Figma file, one file per frame.
Workflow Summary
Screenshot
      ↓
Send to Claude / Gemini + standard prompt
      ↓
AI extracts colours → generates SVG
      ↓
Save .svg file to computer
      ↓
Open Figma → go to blank Design canvas
      ↓
Drag & drop .svg file onto canvas
      ↓
Ungroup → swap icon + component → done
The entire process from screenshot to Figma canvas takes approximately 5–7 minutes per screen. No plugins, no additional subscriptions, no usage limits.
Comments
No comments yet. Be the first!
You need to sign in to comment.